Getting Started with ShellMenu
Requirements:
CBFS Shell
Contents
Introduction
The ShellMenu component allows your application to extend the Windows context menu, enabling you to create custom context menu items for any items selected in File Explorer. Users can access and interact with these menu items, invoking specific actions that are integrated with your application.
The component supports customization options that allow you to modify the visual properties of any custom menu items, such as adding captions and icons. Before continuing, it is recommended to download CBFS Shell in order to follow along with this tutorial.
Creating Menu Items
To begin creating context menu items, start by calling the Install method. This will load a DLL into File Explorer to facilitate communication with the Windows Shell. Installation should be done at least once before using the library on a new system, but may be done several times to update the desired settings.
import callback.CBFSShell;

ShellMenu m_Menu = new ShellMenu();
m_menu.Install();
Following the installation, any custom menu items that will be added to the Windows context menu must be registered to the Windows Registry. To do this, call the RegisterMenuItem method individually for each one. The Verb parameter specifies a menu item's unique text identifier, which is the only information that gets stored in the Registry.
m_Menu.RegisterMenuItem("MyMenuItem");
After that, call the Initialize method to perform setup tasks such as preparing the DLL. Initialization should be done during your application session and only needs to be done once.
m_Menu.Initialize();
The Activate method starts the component. This action will populate the MenuItems collection with the registered menu items, allowing them to be customized by directly modifying their properties.
Before the user can see or interact with any added items in the Windows context menu, their Caption property must be set to a non-empty string. For a full list of available properties, please see our Online Documentation.
m_Menu.Activate();
foreach (var item in m_Menu.MenuItems)
{
if (item != null && item.Verb.Equals("MyMenuItem"))
{
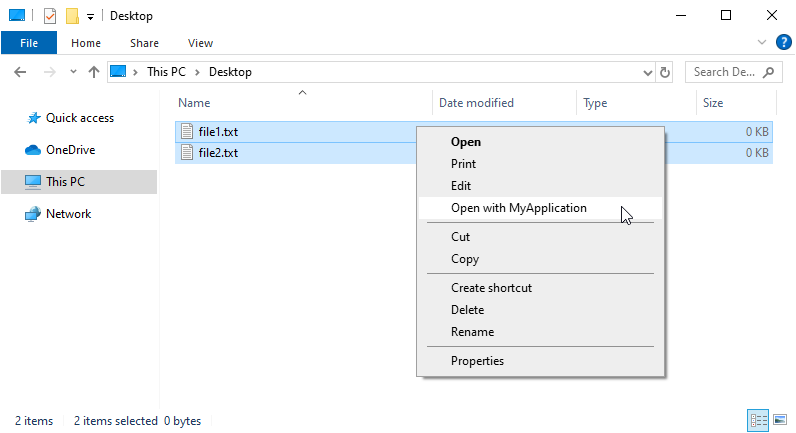
item.Caption = "Open with MyApplication";
}
}
After their Caption property is set, your custom menu items will be visible in the File Explorer's right-click context menu for any selected Windows Shell items.
While the component is active, it will fire events that will allow your application to execute custom actions and logic for each menu item, as well as dynamically adjust menu item properties in response to user interactions in File Explorer.
User Actions
When a user clicks on a custom context menu item, the InvokeMenu event will fire and the SelectedItems collection will be populated with the Windows Shell items selected in File Explorer. The Verb parameter will identify the selected menu item. An application may use the context provided by the SelectedItems collection and the Verb parameter to perform actions specifically tailored to the user's selections.
m_Menu.OnInvokeMenu += (s, e) =>
{
  if (e.Verb.Equals("MyMenuItem"))
  {
    Console.WriteLine("Selected items: ");
    for (var item in m_Menu.SelectedItems)
    {
      Console.WriteLine(item.FileName);
    }
  }
};
The UpdateMenu event is fired right before the context menu is shown to the user. This provides a simple way to update the properties of any menu items before they are displayed. For more detailed information about the UpdateMenu event, please see our Online Documentation.
Deactivation and Uninstall
To stop serving menu items but keep them registered with the system, call the Deactivate method. Deactivation will stop processing requests from the Windows Shell and render all custom menu items inactive.
m_Menu.Deactivate();
To completely remove the previously registered menu items from the Windows Registry, call the UnregisterMenuItem method individually for each one. This step should only be performed once during an application's uninstall routine to avoid polluting the Registry.
m_Menu.UnregisterMenuItem("MyMenuItem");
Finally, to detach the component from the Windows Shell and unregister the DLL from the system, call the Uninstall method. Uninstalling is typically performed only when your application should be removed from the system.
m_Menu.Uninstall();
Handle Errors
The ShellMenu component communicates errors using the error codes defined in the Error Codes section of the component documentation.
The ResultCode parameter of events can be used to report an error when the operation could not be completed successfully. The ResultCode parameter is set to 0 by default, which indicates the operation was successful.
If an unhandled exception occurs in the event handler, it will be caught by the component and an internal error will be reported.
We appreciate your feedback. If you have any questions, comments, or suggestions about this article please contact our support team at support@callback.com.